Quick and Dirty Reverse Engineering
Posted on 15 November 2019
A while ago I had to work with a particularly frustrating application that was required to connect to a hardware appliance. Both of which will remain unnamed in this post.
This application generates it own self signed certificate which it uses to connect to the appliance. The issue was that application generates sha1 certs but the appliance only supports sha2. No problem just use the private key from the application to create a sha2 cert.
But! The application encrypts the private key with a password. Bugga. Furthermore the application utilizes a obfuscated password generator which makes it hard to debug.
The Process:
-
When the application creates the key it prints out “Private Key created and written to”:
[tom@tomandtim reverse_engineering]$ ./program cert add 192.168.0.16 2048 Key size set: 2048 Private Key created and written to: /home/tom/reverse_engineering/cert/client/192.168.0.16Key.pem Certificate created and written to: /home/tom/reverse_engineering/cert/client/192.168.0.16.pem [tom@tomandtim reverse_engineering]$ -
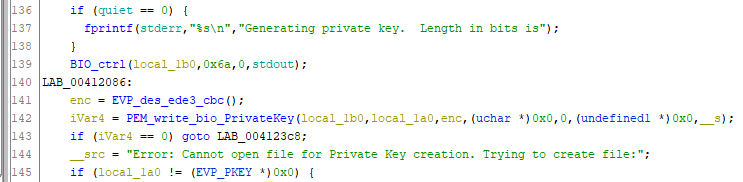
Using Ghidra (the NSA software reverse engineering suite) we can open up the program and find where in the code it uses that string.

- Looking at the code we can see it uses the PEM_write_bio_PrivateKey function of openssl to encrypt and save the private key. So that means at the time of execution the password must be held in memory. So if we pause the application and then dump it’s memory we can find the password!
-
Using
gdbwe can set a breakpoint, run it and then dump the memory using a little memory dumper I wrote-
Start
gdb, set the breakpoint and run the program:[tom@tomandtim reverse_engineering]$ gdb --args ./program cert add 192.168.0.16 2048 (gdb) break PEM_write_bio_PrivateKey Breakpoint 1 at 0x58f260 (gdb) run Starting program: /home/tom/reverse_engineering/./program cert add 192.168.0.16 2048 [Thread debugging using libthread_db enabled] Using host libthread_db library "/lib64/libthread_db.so.1". Key size set: 2048 Breakpoint 1, 0x000000000058f260 in PEM_write_bio_PrivateKey () -
In a new shell locate the pid using
psand run the./mem_dump.shscript. Pay close attention to the script arguments, because we are already debugging the script we use the “dryrun” function to give us the gdb commands we need for the debugging session we already have open. You can disable the dryrun to allow the script todo the dump for you if required.[tom@tomandtim reverse_engineering]$ ./mem_dump.sh ./mem_dump.sh pid dryrun PID = PID you want do dump dryrun = "yes" to just print the GDB commands or "no" to dump the memory Example: ./mem_dump.sh 1234 no [tom@tomandtim reverse_engineering]$ [tom@tomandtim reverse_engineering]$ ps -ef|grep program tom 10850 8534 0 17:12 pts/4 00:00:00 gdb -q --args ./program cert add 192.168.0.16 2048 tom 2037 10850 0 17:12 pts/4 00:00:00 /home/tom/reverse_engineering/./program cert add 192.168.0.16 2048 tom 10890 15995 0 17:12 pts/7 00:00:00 grep --color=auto program [tom@tomandtim reverse_engineering]$ ./mem_dump.sh 2037 yes Dumping Stack... dump memory /tmp/mem_dump_pid_2037_7ffffffde000-7ffffffff000.mem 0x7ffffffde000 0x7ffffffff000 Dumping Heap... dump memory /tmp/mem_dump_pid_2037_007db000-0081f000.mem 0x007db000 0x0081f000 Dumping Program... dump memory /tmp/mem_dump_pid_2037_00400000-00696000.mem 0x00400000 0x00696000 dump memory /tmp/mem_dump_pid_2037_00796000-007db000.mem 0x00796000 0x007db000 Done [tom@tomandtim reverse_engineering]$ -
Type those commands into
gdband allow the program to continue(gdb) dump memory /tmp/mem_dump_pid_2037_7ffffffde000-7ffffffff000.mem 0x7ffffffde000 0x7ffffffff000 (gdb) dump memory /tmp/mem_dump_pid_2037_007db000-0081f000.mem 0x007db000 0x0081f000 (gdb) dump memory /tmp/mem_dump_pid_2037_00400000-00696000.mem 0x00400000 0x00696000 (gdb) dump memory /tmp/mem_dump_pid_2037_00796000-007db000.mem 0x00796000 0x007db000 (gdb) c Continuing. Private Key created and written to: /home/tom/reverse_engineering/cert/client/192.168.0.16Key.pem Certificate created and written to: /home/tom/reverse_engineering/cert/client/192.168.0.16.pem [Inferior 1 (process 2037) exited normally] (gdb) q [tom@tomandtim reverse_engineering]$
-
-
Now we can look through the dump files for a password
[tom@tomandtim reverse_engineering]$ strings /tmp/mem_dump_pid_2037_007db000-0081f000.mem &=Un 9J\o 6Me~ )IZl ;Wt 0F]u bla bla bla authorityKeyIdentifier keyid:always,issuer:always basicConstraints CA:true 4%::<'}z4k$y <------- That looks like a password! authorityKeyIdentifier keyid:always,issuer:always 'A\x <Nau ":Sm /ATh} 2Jc} .?Qdx <Yw -
And try it out:
[tom@tomandtim reverse_engineering]$ echo "4%::<'}z4k\$y" |openssl rsa -in /home/tom/reverse_engineering/cert/client/192.168.0.16Key.pem -check -noout -passin stdin RSA key ok [tom@tomandtim reverse_engineering]$ -
Done!